Difference between revisions of "SIG:GraphTechnologies"
| Line 1: | Line 1: | ||
| + | |||
| + | |||
| + | == Introduction == | ||
| + | |||
As TEI is not a format, though many people think it is. It's a de facto standard that specifies Guidelines for document interchange. Actually the Guidelines are based on the XML but this is only one possible technical way of expressing the phenomenons. | As TEI is not a format, though many people think it is. It's a de facto standard that specifies Guidelines for document interchange. Actually the Guidelines are based on the XML but this is only one possible technical way of expressing the phenomenons. | ||
| Line 8: | Line 12: | ||
The main goal of the TEI-Graph-SIG is to model the textual phenomenons of the TEI in a Graph and to develop routines to import TEI-encoded XML-files into graph databases. | The main goal of the TEI-Graph-SIG is to model the textual phenomenons of the TEI in a Graph and to develop routines to import TEI-encoded XML-files into graph databases. | ||
| + | |||
| + | == Convert DTA-XML with neo4j to Standoff Property JSON == | ||
In a first step we import a small xml-example into a [https://neo4j.com neo4j] instance using [https://github.com/neo4j-contrib/neo4j-apoc-procedures-function apoc.import.xml] | In a first step we import a small xml-example into a [https://neo4j.com neo4j] instance using [https://github.com/neo4j-contrib/neo4j-apoc-procedures-function apoc.import.xml] | ||
| Line 16: | Line 22: | ||
<code> | <code> | ||
| − | + | // Import xml-example from DTA to neo4j | |
| − | // Import xml-example from DTA to neo4j | + | call apoc.xml.import('https://seafile.rlp.net/f/6282a26504cc4f079ab9/?dl=1', {connectCharacters: true, charactersForTag:{lb:' '}, filterLeadingWhitespace: true}) yield node |
| − | + | return node; | |
| − | call apoc.xml.import('https://seafile.rlp.net/f/6282a26504cc4f079ab9/?dl=1', {connectCharacters: true, charactersForTag:{lb:' '}, filterLeadingWhitespace: true}) yield node | ||
| − | |||
| − | return node; | ||
</code> | </code> | ||
| Line 27: | Line 30: | ||
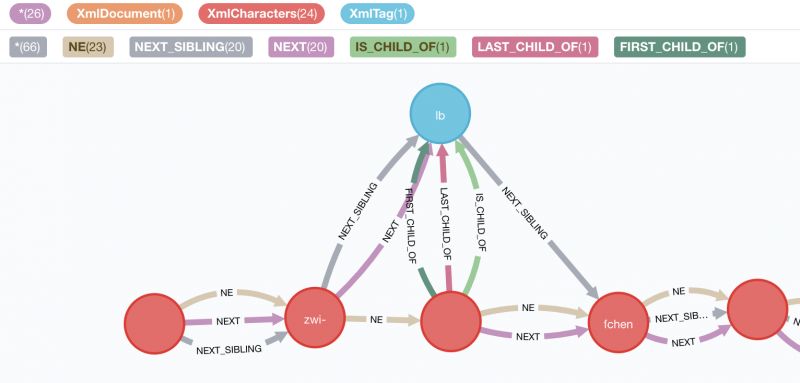
[[image:TEI-Graph.png|left|800px|x]] | [[image:TEI-Graph.png|left|800px|x]] | ||
| + | |||
The next step is to export the data with some [[cypher]] to the Standoff-Property JSON-Format. | The next step is to export the data with some [[cypher]] to the Standoff-Property JSON-Format. | ||
Revision as of 19:11, 25 January 2019
Introduction
As TEI is not a format, though many people think it is. It's a de facto standard that specifies Guidelines for document interchange. Actually the Guidelines are based on the XML but this is only one possible technical way of expressing the phenomenons.
The aim of the Graph-SIG is to find a way of expressing the language phenomenons of the TEI in Graphs.
- In the graph you can use multi-hierarchical annotations layers.
- Graph models are very easy to read and understand. So DH-People and “normal” scientists have a level of discussion in common.
- A Graph can be expressed as RDF so the step from a Graph to linked open data is easy to make.
The main goal of the TEI-Graph-SIG is to model the textual phenomenons of the TEI in a Graph and to develop routines to import TEI-encoded XML-files into graph databases.
Convert DTA-XML with neo4j to Standoff Property JSON
In a first step we import a small xml-example into a neo4j instance using apoc.import.xml
The example is a page from the DTA. Here you can find the XML-Testfile and this is the Link to the DTA-Version.
The import to neo4j runs with:
// Import xml-example from DTA to neo4j
call apoc.xml.import('https://seafile.rlp.net/f/6282a26504cc4f079ab9/?dl=1', {connectCharacters: true, charactersForTag:{lb:' '}, filterLeadingWhitespace: true}) yield node
return node;
In the next picture you can see a small set of the Graph:
The next step is to export the data with some cypher to the Standoff-Property JSON-Format.
This json can then be imported in the [SPEEDy] Standoff Property Editor which can be found on [GitHub].
At the end of the README-Section you can find a [Link] to Test-Istance hosted on [Github-Pages].
Just copy the json in the window below the UNBIND-Button and press BIND.
